Introduction
In my previous article, I showed how to connect to an Amazon RDS host by changing the security group and allowing direct access to port 3306. This works but does have security implications in that potentially the entire internet can start pinging your RDS server.
In this article, I’m going to show how to use a Bastion host which does not need us to expose the database access port (port 3306 in the case of MySQL) to the internet.
What is a Bastion Host ?
Wikipedia defines a Bastion Host as:
a special-purpose computer on a network specifically designed and configured to withstand attacks. The computer generally hosts a single application or process
What this means, in terms of connecting to a MySQL RDS instance, is that MySQL is not installed on the Bastion server, rather we use the Bastion server as a “jump” point to allow us to get to the real database server.
I'm not going to go into details on how to harden a bastion server, I'm concentrating on how to access MySQL through the server. Check out this blog post for more details on how to controll network access using a bastion server.
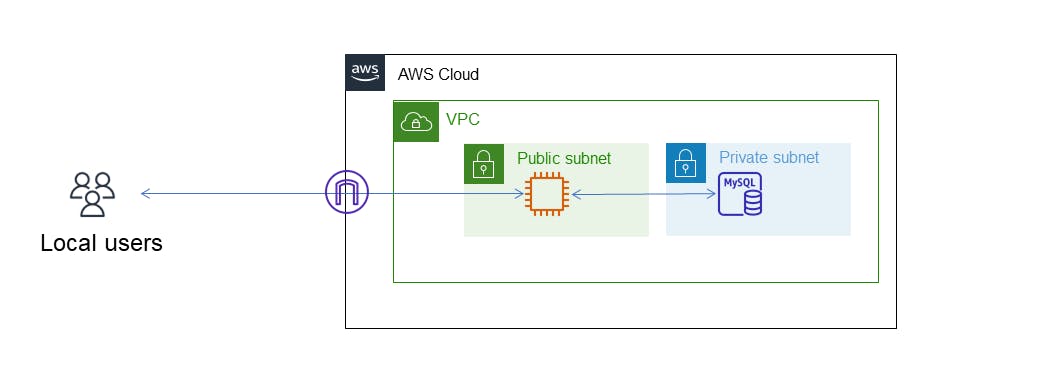
When using a Bastion server, the network topology looks something like:

In terms of AWS, to create a Bastion Server, we need to create a EC2 instance (in my case, I created a t2.micro instance). We need to ensure that the EC2 instance is in the same VPC as the RDS database otherwise they will not be able to connect to each other. This is a key point. If the bastion server and the RDS database are not in the same VPC, then this technique will not work.
For the security groups, the Bastion server should be configured to only allow ssh traffic from a known host(s) which is your local network. Note that it is not necessary to allow network traffic into the bastion host on the database port (3306). The only access required from the global internet is via port 22 (ssh port).
The security group for the RDS instance should be configured to allow traffic from within the VPC which enables access from the Bastion host.
SSH Tunneling
Once we've set up the networking and got an EC2 instance that can be connected via ssh from a local machine, we need to set up a ssh tunnel from our local machine through to the RDS database via the bastion host. This is achieved with the ssh command. If you're a Linux/Mac user, this will most likely already be installed. For Windows users, it is available from within Powershell.
An ssh tunnel is basically a way of routing network traffic from one place to another via a ssh host. In our case, we are routing traffic from our local machine to a RDS instance via a Bastion host. For more information about ssh tunnelling, check out this article.
To create a ssh tunnel, we execute the ssh command as follows:
ssh -N -L <local port>:<database host name>:<remote port> \
  <bastion-user>@<bastion-host> -i <bastion-host-key-file>
<local port> is the source port on the local machine that we can use for connecting to from local applications. It makes sense to set this the same as the remote port if possible, but this can be set to any free port. For connection to MySQL, I set this to 3306
<database host name> is the host name of the RDS instance. This can be found in the RDS console but will be along the lines of xxx.xxx.us-east-1.rds.amazonaws.com
<remote port> is the port number we want to connect to on the remote RDS instance. For MySQL, this is usually 3306
<bastion-user> is the username that can be used to connect to the bastion host. For a standard EC2 instance, this would usually be ec2-user
<bastion-host> is the host name or ip address of the bastion server.
<bastion-host-key-file> is the full path to the .pem key file created when the EC2 instance was created.
-N tells ssh not to execute a remote command, essentially telling it to create a tunnel only and no interactive terminal connection.
The full ssh command would therfore look something like:
ssh -N -L 3306:xxx.xxx.us-east-1.rds.amazonrds.com:3306 \
  ec2-user@xxx.xxx.xxx.xxx -i ~/bastion_key.pem
Connection to MySQL
After creating a tunnel, we can connect to MySQL as though the database were running locally. The host name will be 127.0.0.1 and the port will be 3306 (127.0.0.1 is implicitly implied by the ssh command above and 3306 is the local port we defined above).
Note that we have to use 127.0.0.1 instead of localhost when connecting via the ssh tunnel, or the MySQL client will believe we are attempting to connect to a local instance via shared memory or via a Unix socket and will not connect. For more details check out the MySQL Documentation.
~ ❯ mysqlsh  -u admin -h 127.0.0.1
Please provide the password for 'admin@127.0.0.1': **********
Save password for 'admin@127.0.0.1'? [Y]es/[N]o/Ne[v]er (default No): v
MySQL Shell 8.0.26

Copyright (c) 2016, 2021, Oracle and/or its affiliates.
Oracle is a registered trademark of Oracle Corporation and/or its affiliates.
Other names may be trademarks of their respective owners.

Type '\help' or '\?' for help; '\quit' to exit.
Creating a session to 'admin@127.0.0.1'
Fetching schema names for autocompletion... Press ^C to stop.
Your MySQL connection id is 22
Server version: 8.0.23 Source distribution
No default schema selected; type \use <schema> to set one.
 MySQL  127.0.0.1:3306 ssl  JS >
Conclusion
In this article, we've seen how we can use the ssh command to create a tunnel between our local machine and a RDS server via a bastion host. This allows us to connect to a RDS instance without having to expose the RDS instance directly to the internet.
Credits
Photo by Andrew Neel on Unsplash
